Neptune Aquatics

Mike's Machination

yeah other screws came out with a bit of a squeak, the nails over there (no screws) came out with a screech

Those sounds seem normal for hardware not attacked by salt. If there had been saltwater on them they would most likely have just broken off! Screws are the worst.
 
Well my spills have never been salt related except the occasional splash here and there where taking out a suction tube while doing a water change, they've been either 1) freshwater 2) kalkwasser or 3) One of the 2-part solution, the latter 2 due to the peristaltic pumps taking a crap on me and leaking all over the place. Most of my spills have been freshwater, however not in that area, so that's all calcium or alkalinity attacking nails, which were quite a bit rusted, however not as rusted as some on my stand that was near the sump and the "spritz zone"
 
Ok the pile of wood was gone last weekend, now I'll probably pull the joists and run it straight to the concrete then build the floor on, not sure if that will happen this weekend it's valentines day and the wife wants to go snowboarding... *sigh*.

Anyways chopped up some old cardboard just to get a feel for where the tank will go and had a couple of thoughts.
The room the tank will be in is approximately 14.5 feet in one direction and 24 feet in the other, right in the middle there's a fat post that's holding up a beam that's basically holding up the back of the house. That post ain't going anywhere.

My plan was to more or less center the tank on one side (see option A in attached picture) and have it 3 side viewable, it's wide enough that I'm sure fish should feel secure regardless of where they're at, however everything is going to be enclosed floor to ceiling so it effectively blocks off a hunk of the room. However my wife mentioned that it might make it hard to make use of the space effectively. I'd basically have about 4.5 feet on each side of the tank to the wall, so that kind of excludes putting in a couch to just relax and watch fish, and I'd be stuck with bar stool type chairs, now before people say "4.5 feet, how wide is your couch!?" remember you need to walk in front of the couch which can be anywhere from 3-3.5 feet so very little move room doubly so if I actually want to do any work on the tank itself at least with bar stool type chairs I can move them out of the way. I also wanted to do a surround counter/bar area right at the level of the tank to assist me with getting into the tank, or maybe just some place to put a container.

Backup plan (option B in attached picture) was to put the tank in the corner, but I lose a viewing side, I gain a lot more access space (almost 8 feet on one side) and overall would have more "behind the scenes" room. Unfortunately I'm torn because having that 3rd viewing panel might be too much to give up, although the other side is if I put up some black/blue plastic I give a nice illusion of depth in two directions.

Option A
Pros
3 side viewable
Less walls to cover with FRP
Condensation against window not a worry since it won't be next to a window.

Access
3 sides will have removable panels
"behind the scenes" will essentially consist of a 2' x 2' area next to the sump

Option B
Pros
Less viewing window that needs cleaning
More "depth" in another direction, fish might feel more secure
Another side that I can build closer to with rock structures
Another wall I could put pumps on (option A I'm really restricted to the backwall which is 1" thick or using the closed loop holes)
Less doors/panels that I need to make for the stand/top
More room space to put chillaxation couch, plus I could still have bar stools if I want
Counter/bar area won't restrict my already restrictive space
Ventilation fan easier to go outside
Proximity to window could allow me to do all the messy stuff right out the window (concrete pad outside window)

Access
2 sides will have removable panels
"behind the scenes" will be 2' x 8' long walkway behind the tank plus 2' x 2' area next to the sump.
 

Attachments

  • Tank Layout.png
    Tank Layout.png
    19 KB · Views: 254
So how about option C:
Put the tank right up against the window, and put a big shed outside, against the house,
send pipes through the window, and put all the sump/pumps/noisy/nasty stuff outside.
I have it all in the garage, and it is REALLY nice.

At any rate:
While option A technically has 3 sides, it seems more like 1 front side, and 2 rarely used sides.
While option B really does have 2 full sides.
I would think a big tank centered, ruining walking flow of room, would be a big problem.
So I vote for B.
 
Option C ain't going to happen. There's a lean-to greenhouse out there. My largest concern is power used to heat the tank, I don't want to have to fight mother nature to heat the tank if the weather gets cold the other side of that is when the Sun starts coming out we're pushing 90+ in there so I have the worst case scenario pretty much year round.

And I really have no longing desire to try and grow corals under natural sunlight out there if I'm paying PG&E gobs of money to fight against the climate.
 
Pulled out joists on one half of the room (well half of the half), looks good so far, enough crap in the air that I'm sure that room should get a prop 65 sticker on it. Wife asks me if I've decided what to do, I said I'm probably going to put it in the corner... now she changed her mind and likes the idea of it in the middle with 3 sides viewable. *sigh*

Oh and when topping off the water in the other tanks, notice a rusty rod at the bottom of the trashcan with the RO/DI water... god damn nails that are flinging all over the place made it in. IRON IN THE TANK!!!!!! :D Upside is the nail was not galvenized with zinc.
 
Thought of an option C. Put the back of the tank against the post, off set a bit so the sump can go beyond it, I lose about 6 inches against the window side (still 4-ish feet of space between tank and wall), gain that on the other side making something like a couch feasible, the front viewing pane would get 2 more feet between it and another barrier. Downside is you don't see the glory of the tank when you walk into the room, you'll see a side of it but not the whole thing. Also I'd have to run wires through the ceiling to bring power to the center (which isn't that much of an issue) I might still be able to get an easy run for ventilation out the back too (or at the very least make a bulkhead since the floor is lowered at that location.

(recycled picture sorry :D)
Tank Layout Option C.png
 
Unless you put a small bar/table around the tank, I don't really see people using the stools much.
Hmmm .. put a keg in the sump area ... fun.

You can put power in the floor if you still have it open. Floor plugs are handy anyway,
and easily covered by a rug later.
 
Option D is in full effect! More on what this is after everything is actually assembled though :D

Ok so all the wood joists on one side of the room have been removed, option D allows for an easier rerouting of power so I can go 12-3 and share a neutral so I get 2-20amp circuits dedicated to the tank. I do need to create a bulkhead due to a heater vent that will inconveniently be right over the tank as I really don't want any noises coming up and I'm going to be sure to use plenty of sound proofing insulation between it and the tank.

Decided to go straight to the concrete slab and deal with the sloped floor as it is, the slope is by no means major, but if you put a ball down it will roll towards the floor drain.

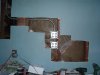
Laid down about 30 square feet of tile, all of a sudden remembered the back pain from when I did my bathroom some 7 or so years ago (plus I'm 7 years older and more wussified) Advil and a hot shower seemed to help though. Decided to do tile directly under the tank plus a little overhang, then some engineered flooring the rest of the way, after today I'm glad I went that route because 30 square feet would be less than a tenth of the room, and I'd hate to think about doing what I did 10 times longer.

So the plan now is to.
- Finish up the tiling (edges) plus a few pieces I need to cut. This might happen next weekend
- Reroute power. Could happen anytime this week if I get motivated.
- Install ventilation. Ditto
- Put up drywall. Still working on this since a sheet of drywall won't fit in the Prius
- Build bulkhead around heater vent. Again could happen this week
- Build stand
- Move sump
- Buff out sump
- Move Tank
- Buff out tank
- Figure out if I want to use closed loops or weld-on them shut.
- Finish up "canopy" part
- Get water in the tank and start the cycle
- Move fish/corals over (saw planeria kicking up again in my coral tank *grrrr*)
- Rip out OTHER half of the room
- Reroute water pipes
- Make wife happy by getting laundry area cleaned up and never again using machines as place to put fish related stuff
- Put in flooring
- Relaxation and hope it all works out fine with a cold one in my hand.
 
Not sure how much drywall you are doing. Just used an awesome contractor for my downstairs. Lemme know if you want his number. Super good job, nice guy, good price.
Also, I've done a lot of work lately, so if you need help with anything I'm decently handy...
 
Thanks for the offer Mike. IMO it's nothing "BIG" that needs doing (except maybe moving the tanks, although to be honest my wife and I and 2 dolly's probably could move everything), it's just the little things that will add up. I don't have any issue doing drywall, my issue stems more from the fact that it comes in 4 foot by 8 foot sheets and my tiny car can't fit that :D
 
Yeah I can get a rental for $19.95 or whatever if it comes to that. I just want to make sure I have a list of everything large that I'll need before I go out and buy, drywall, plywood, etc. Or I can just wait until my wife goes back to the farm and have her drive back a truck.. I mean no way that'll cost more than $20 in gas and bridge fare would it? :D
 
Ran electrical yesterday. Surprised it took so damn long. Oh well better to do it right than wrong :D
Had to steal the conduit that went to the washer drier (not sure why I ran conduit there instead of NM wire but whatever I disconnected that and added an additional run to where the tank will go, ran NM right to the washer/dryer (had to get that working first or I might get in deep trouble :D. Then ran the conduit through the joists and to the wall only to find more of those fricking angled supports nailed between the walls! *GRRRR* after plenty of cutting into drywall I finally found a place I was willing to stick with (mostly because I didn't want to have to try and drill for the conduit through thtere.

Why did I want to use conduit instead of just running NM wire? I wanted to bring two circuits to the tank, just in case, share a neutral, and I have a large roll of 12-2, I have a large spool of 12 gauge, I basically reused the washer/dryer wire for the tank and ran an additional 12awg wire in the conduit. Basically I didn't want to have to buy a run of 12-3 NM wire, 25 feet would be too short, so I'd have to get a 50ft spool which would cost over $60, a 250ft spool of 12-2 is just over $70, the frugal nature of me couldn't justify that, it would have been cheaper to do two runs of 12-2 wire, I mean I could have run a 12g wire next the the 12-2 and when I covered it up it would have been my dirty little secret but nah.. why risk the insurance adjuster denying a claim if anything happened.

Also found a little nest that was made in the wall next to one of those fire stops, somehow climbed way up there, put a bunch of stuff to make it nice and cozy, including stripping the sheathing off one of the wires for a plug. Luckily it was just the neutral but you can still get zapped there too. Either way I didn't want to know if anything was in there so I just turned on the shop vac and shoved the hose into the wall to suck everything out.

I'll patch up the wall later, I'm to the point though where I Might as well just replace the whole damn wall in that area :D instead of playing Tetris with the pieces I have. Might just do that as well to put some insulation on that wall anyways.

Either way wife wants to go snowboarding this weekend, so I basically am screwed out of getting anything done. I'm getting too old for this.
 

Attachments

  • P1010007.JPG
    P1010007.JPG
    169.9 KB · Views: 228
The tank is larger than 180g... quite a bit larger. The 180g was the old tank.

The idea wasn't to plug everything directly into that, I'll still use a DJ power strip or 2, plus whatever controller plugs, I just wanted to always have at least one plug I can go into. Each set of 4 plugs is a 20 amp circuit though, so there's enough juice there (or better be!)
 
I'll patch up the wall later, I'm to the point though where I Might as well just replace the whole damn wall in that area :D instead of playing Tetris with the pieces I have. Might just do that as well to put some insulation on that wall anyways.

You're experiencing the builders version of feature creep! ;)

You could turn that tetris piece into a rectangle and make an easy patch.
 
Yeah that's be great if the patchwork was a nice rectangle! I also might want to vent out at that height too, hell I have power right there I can tap into without running a new line! Having deciding if I want to vent lower or high, it will be horizontal run right out of the back of the house though.
 
Back
Top