got ethical husbandry?

pixelpixi's new tank

Hi everyone. I haven't posted here much for a while, but recently I've been working on a new tank build and wanted to share my project with you all.

Several years ago I bought the old system from a coworker who had gotten out of the hobby. It was about 60 gallons and came with an integrated one piece stand/canopy. It served me well, but had become quite beaten up over time so I've really been wanting to replace it. I decided this was a good time to do it because I'm in the midst of a remodel and had to move the tank so the flooring could be replaced anyway.

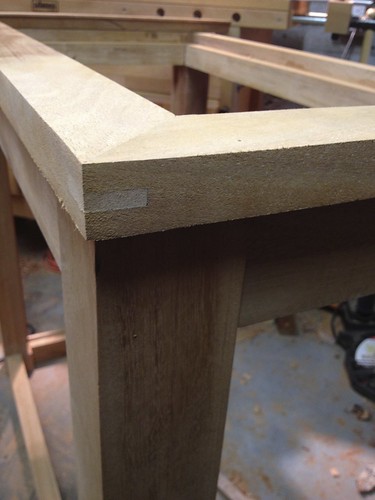
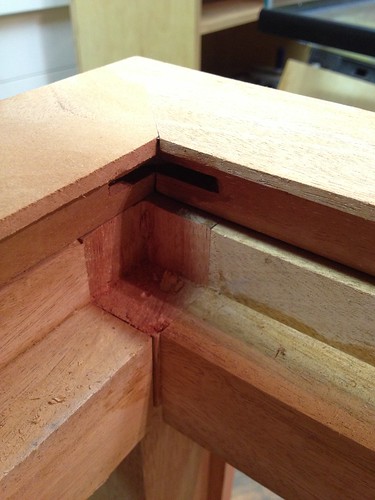
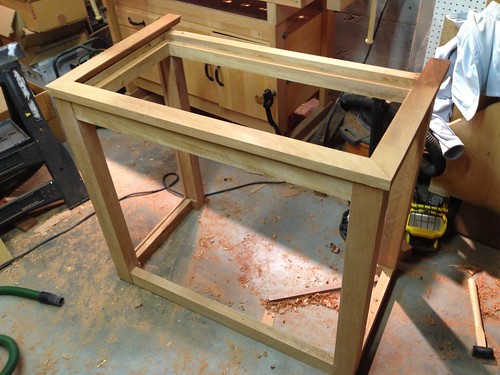
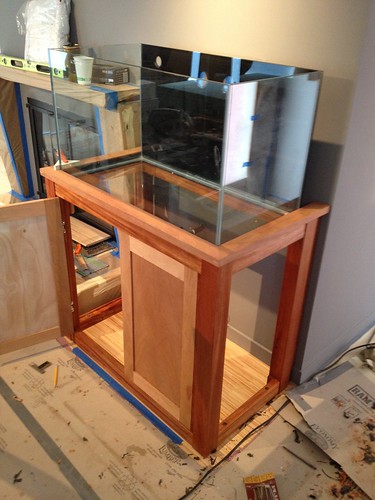
Another hobby of mine is woodworking, so with the stand for this tank I really wanted to build something that I could be proud of the craftsmanship in. I decided to take a furniture maker's approach to the stand, using solid mahogany legs and aprons, joined with sturdy mortises and tenons. For earthquake safety the aprons and legs have a recess that the tank drops down into, so it's not possible for the tank to slide off. The whole thing is bolted to the floor to keep it from ever tipping over.

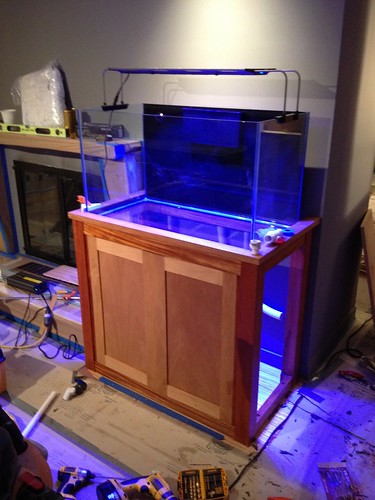
I also wanted a sleeker more modern appearance, so I went rimless with an oceanic illuminata tank. I also replaced the 250w MH and VHO actinics with a new maxspect razor 160w fixture.

I'll follow this up with some pictures and more details soon!
 
Okay, here are some pictures. First, the sketch-up model. The doors are not shown, but will be frame and panel with flat panels and a square profile.


Here are the parts milled up for the frame. In this shot, the mortises aren't totally finished and the tenons haven't been cut yet.


Lots of dust from milling all that!


The splined miter joints on the top rail.


Shot of the inside corner. The tank rests on both the leg itself and on the aprons. The rail is built with a space so it will cover up the plastic trim on the tank.


Here it is assembled, but without the doors and side panels:

 
Here the frame has been finished, leveled, and bolted in place. The finish is two coats of ZAR Tung Oil finish followed by several coats of satin wipe-on poly. In the background you can see wood shavings from leveling the stand and plastic shavings from planing down the trim on the tank. I made the recess just a little too tight.


Tank in place and doors being dry fit. I used SOSS "invisible hinges" which are a little tricky to install but look great and come in stainless steel.


Trying out the lights! So far I like them. The overflow is installed in this photo too, though with spa flex that I later swapped out for rigid PVC.


That's it for today! I'll post photos soon with everything moved into their new home.
 
Thanks, Denzil! I don't have schematics with measurements, but here's the sketchup file if you'd like to see it. I built directly from it and it includes precise details and measurements except for a few things that I changed on the fly.

https://dl.dropbox.com/u/41619449/AquariumStand.skp
 
Mahogany ... mortise and tenon joinery ... pretty fancy!
Looks great.
You are making us look like a bunch of hacks.
And the mahogany should stand up really well to the moisture.
(I had a door warp on me a bit because I did not seal it that well)

Interesting overflow design. How close to the top will the water be?
 
That looks amazing, Erin! Nice job on the stand, and interesting concept for earthquake safety.

What have you got planned for the sump?
 
Thanks, guys!

The water is about an inch from the top. The overflow is loosely based on the bean animal overflow. (http://www.beananimal.com/projects/silent-and-fail-safe-aquarium-overflow-system.aspx). Basically there is a 3/4" downpipe with a gate valve that runs at full siphon, and a 1-1/2" downpipe that takes a tiny trickle of water. To keep it slimmer inside the tank, though, I used an overflow box from glassholes.com inside the tank. Two 1-1/2" bulkheads connect that box to another box that hangs on the back and has the downpipes. It's working really well and is totally silent.

For now the sump is just the old sump that I had. It has a return section that I also use as a frag tank, and a pump section with the return pump and skimmer. It's fairly beat up too, so I'll probably build a new one soon. I may also put in a acrylic pan to catch any drips and spills.
 
BAYMAC said:
lattehiatus said:
interesting concept for earthquake safety.

Commonly known as an earthquake lip. Every stand I have ever had built, or built, used that :)

Ah - the only tanks of yours I've seen are the ones that are now being maintained by someone else. ;) The earthquake lip is a nice feature, probably ought to be standard in our area.
 
lattehiatus said:
BAYMAC said:
lattehiatus said:
interesting concept for earthquake safety.

Commonly known as an earthquake lip. Every stand I have ever had built, or built, used that :)

Ah - the only tanks of yours I've seen are the ones that are now being maintained by someone else. ;) The earthquake lip is a nice feature, probably ought to be standard in our area.

And it has an earthquake lip, so be default every tank you have ever seen of mine has one :p

They have been standard amongst numerous Bay Area stores and builders for years, not sure why the shift to not using them as much. Probably a result of the rimless fad.
 
I'm very much rethinking my stand build now because of Erin. While I don't think I can match Erin's woodworking skills, I'll at least try to. :)
 
Back
Top