This DIY thread will discuss how to replace the existing stock fans in the Aquapod 24 with the more quieter Silenx fans.
While replacing a fan should be a quick swap plug and play, it is not the case with the Aquapod 24. The problem is the 2-pin power plug from the stock fan is glued down to the circuit board. It may be possible to remove the glue so you could remove the plug but there is a risk of damaging the pins or the actual circuit board itself. The best course of action is to cut the wires, leaving the power plug still in the board and then connect it to the Silenx fans.
The other issue is the Silenx fans have three wires that are not color coded while the stock fan power plug has two wires, red and black. It will be tricky to match which wire goes to which. You could essentially buy a 3-pin to 2-pin fan adapter cable to make this job easier but you can save $5-$10 and not have to.
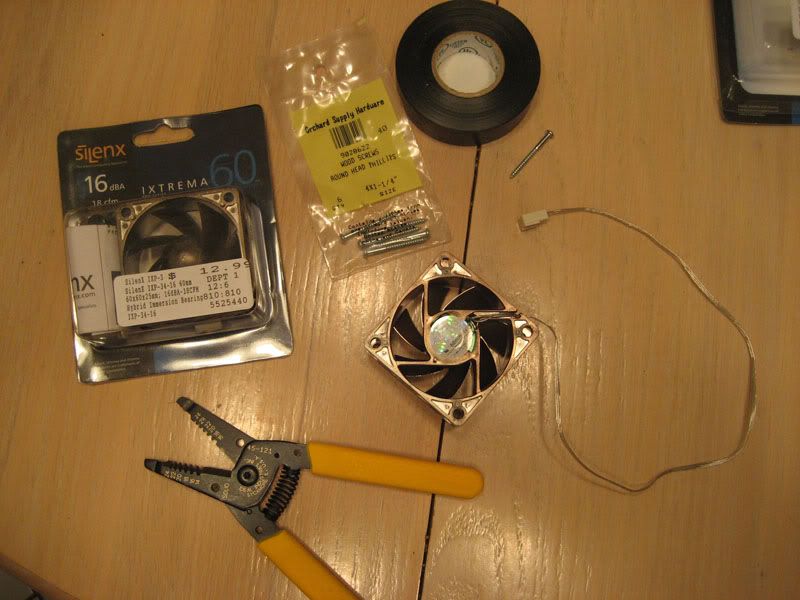
A list of things you will need:
- two Silenx 16db 18cfm fans
- phillips screwdriver
- wire cutter/stripper
- eight 4 x 1-1/4'' screws
- electrical black tape
Preparation
-You can either remove the hood to work on this project or open it to a 90 degree angle and find something to cover up the tank so nothing falls into the water. I left the hood on and covered up the tank with a board and towel.
- Make sure power is off, especially the lights, unplug them to be safe.
1. Open up the hood and with your screwdriver, unscrew the plastic splash shield. Keep the screws in a small dish so you dont lose them.
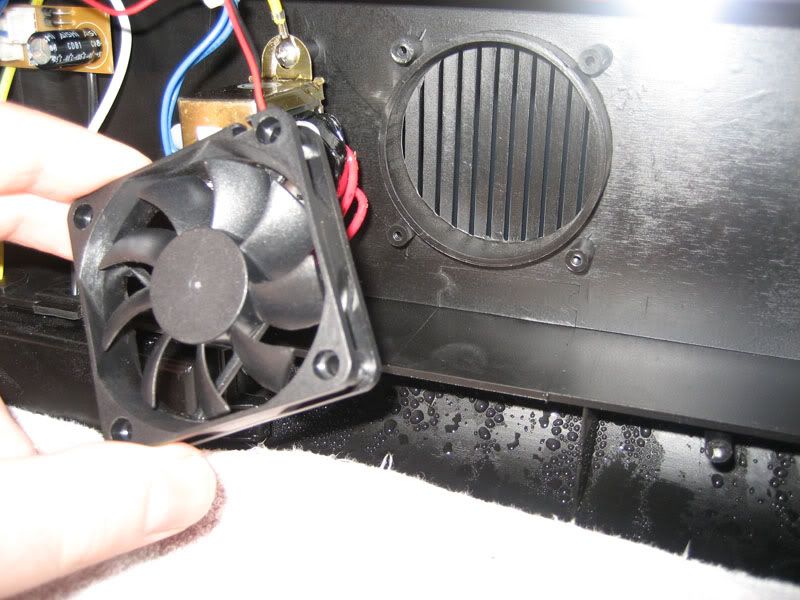
2. (Fig. 1) Unscrew one of the stock fans (just ONE for now so you still have a stock fan connected to use as a test) from the hood and place the screws in the dish.
Fig. 1 Removing stock fan, just do one at first until you figure out how to get the first Silenx fan working. Then do the 2nd stock fan.[/SIZE]
3. With your wire cutters, cut both the red and black wire as close to the fan as you can so that it leaves you some wire to work with.
4. With the wire stripper, use the #22 hole and strip off 1'' inch of the wire casing on both the red and black wire.
5. With your Silenx fan and wire cutters, cut all three gray/silver wires, leave about 6 inches or more of wire left on the Silenx fan.
6. With the wire stripper, use the #24 hole and strip off 1'' inch of the wire casing on the Silenx MIDDLE wire and one of the SIDE wires to the left or right of it. Leave the 3rd wire alone, you may or may not need to mess with it anymore (you will find out in steps 9 &10).
7. With the MIDDLE wire of the Silenx fan and the red wire from the stock power plug, twist the two exposed wires together, making sure they are wrapped tight together.
8. With the SIDE wire from the Silenx fan, twist it together with the black wire from the stock power plug.
9. Turn on the power to the lights/fans to test the Silenx fans. At this point, the other stock fan you havent touched yet should be running. Is the Silenx fan running too? If yes, success! Go to step 11. If not, go to step 10.
(10.) Turn off power. Unwind the silenx SIDE wire that goes to the black wire and strip the 3rd wire of the silenx fan and hook up that wire to the black wire instead and turn on power to test again. The Silenx fan should now be running.
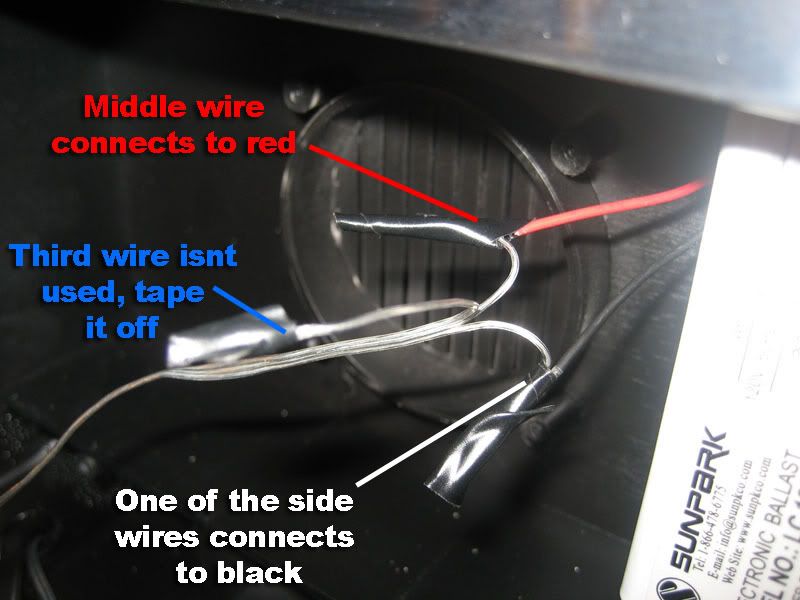
11. (Fig. 2) Using the black electrical tape, cover up the explosed wires by wrapping the tape around the ends.
Fig.2 Wiring Silenx wires to original stock fan plug. Notice the three silver wires. The middle wire is connected to the red wire while one of the side wires is connected to black. You will have to test one of the side wires to find out which one will work. [/SIZE]
12. Using the 4 x 1-1/4'' screws, screwdrive in the Silenx fan to the hood where the original stock fan was. Its up to you if you want the fan blowing in or out. I have mine both blowing in for now.
13. Repeat steps 2 thru 12 to replace the 2nd stock fan with the 2nd Silenx.
14. Put the splash shield back on and screwdrive back in screws.
15. Turn on power and enjoy peace and quiet and more reliable and better quality fans.
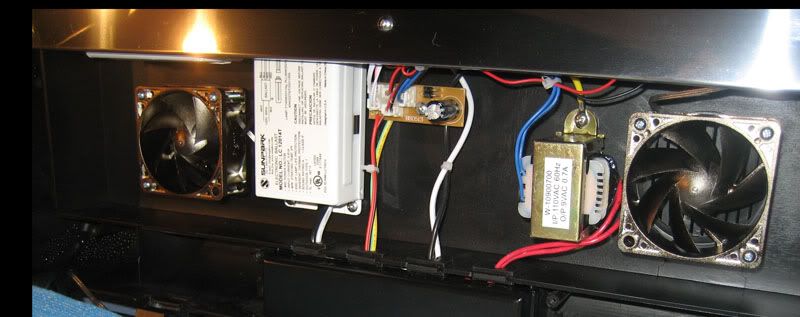
Finished! Two new Silenx fans installed!
While replacing a fan should be a quick swap plug and play, it is not the case with the Aquapod 24. The problem is the 2-pin power plug from the stock fan is glued down to the circuit board. It may be possible to remove the glue so you could remove the plug but there is a risk of damaging the pins or the actual circuit board itself. The best course of action is to cut the wires, leaving the power plug still in the board and then connect it to the Silenx fans.
The other issue is the Silenx fans have three wires that are not color coded while the stock fan power plug has two wires, red and black. It will be tricky to match which wire goes to which. You could essentially buy a 3-pin to 2-pin fan adapter cable to make this job easier but you can save $5-$10 and not have to.
A list of things you will need:
- two Silenx 16db 18cfm fans
- phillips screwdriver
- wire cutter/stripper
- eight 4 x 1-1/4'' screws
- electrical black tape
Preparation
-You can either remove the hood to work on this project or open it to a 90 degree angle and find something to cover up the tank so nothing falls into the water. I left the hood on and covered up the tank with a board and towel.
- Make sure power is off, especially the lights, unplug them to be safe.
1. Open up the hood and with your screwdriver, unscrew the plastic splash shield. Keep the screws in a small dish so you dont lose them.
2. (Fig. 1) Unscrew one of the stock fans (just ONE for now so you still have a stock fan connected to use as a test) from the hood and place the screws in the dish.
Fig. 1 Removing stock fan, just do one at first until you figure out how to get the first Silenx fan working. Then do the 2nd stock fan.[/SIZE]
3. With your wire cutters, cut both the red and black wire as close to the fan as you can so that it leaves you some wire to work with.
4. With the wire stripper, use the #22 hole and strip off 1'' inch of the wire casing on both the red and black wire.
5. With your Silenx fan and wire cutters, cut all three gray/silver wires, leave about 6 inches or more of wire left on the Silenx fan.
6. With the wire stripper, use the #24 hole and strip off 1'' inch of the wire casing on the Silenx MIDDLE wire and one of the SIDE wires to the left or right of it. Leave the 3rd wire alone, you may or may not need to mess with it anymore (you will find out in steps 9 &10).
7. With the MIDDLE wire of the Silenx fan and the red wire from the stock power plug, twist the two exposed wires together, making sure they are wrapped tight together.
8. With the SIDE wire from the Silenx fan, twist it together with the black wire from the stock power plug.
9. Turn on the power to the lights/fans to test the Silenx fans. At this point, the other stock fan you havent touched yet should be running. Is the Silenx fan running too? If yes, success! Go to step 11. If not, go to step 10.
(10.) Turn off power. Unwind the silenx SIDE wire that goes to the black wire and strip the 3rd wire of the silenx fan and hook up that wire to the black wire instead and turn on power to test again. The Silenx fan should now be running.
11. (Fig. 2) Using the black electrical tape, cover up the explosed wires by wrapping the tape around the ends.
Fig.2 Wiring Silenx wires to original stock fan plug. Notice the three silver wires. The middle wire is connected to the red wire while one of the side wires is connected to black. You will have to test one of the side wires to find out which one will work. [/SIZE]
12. Using the 4 x 1-1/4'' screws, screwdrive in the Silenx fan to the hood where the original stock fan was. Its up to you if you want the fan blowing in or out. I have mine both blowing in for now.
13. Repeat steps 2 thru 12 to replace the 2nd stock fan with the 2nd Silenx.
14. Put the splash shield back on and screwdrive back in screws.
15. Turn on power and enjoy peace and quiet and more reliable and better quality fans.
Finished! Two new Silenx fans installed!