Jestersix

Rygh's 250 gallon upgrade

rygh

BOD
BOD
First off, I have to admit I am only doing this thread to get my 200 post sign-off
for all those free frags you guys give out at the swaps. J)

Some quick boring history.
When I was a kid, I had a freshwater tank for quite a few years.
Lost interest in high school ... girls ... Oh well, what can you do.
Now that I am an old fart, married with family, those high school girls are less interesting. Err. Yes, definitely. Err.
At any rate, a few years back, I started another freshwater tank.
Fun for a while, but limiting.
Then upgraded to a 75 gallon saltwater. My kid got the old freshwater tank.
Definitely a lot more fun.
But even that became limiting after a few years.
I really like the lager fish. Love to have a nice Tang or two, but not really viable in a small tank.
Plus, I want more room for coral and such. Beyond the simple softies I have now.

So after lots of "negotiating" with the wife : Time for a bigger tank!!!

Our house happens to have a large TV alcove in the family room.
Designed when TV's were actually big huge clunky things.
So I moved the TV to the other wall. Love flat screens!
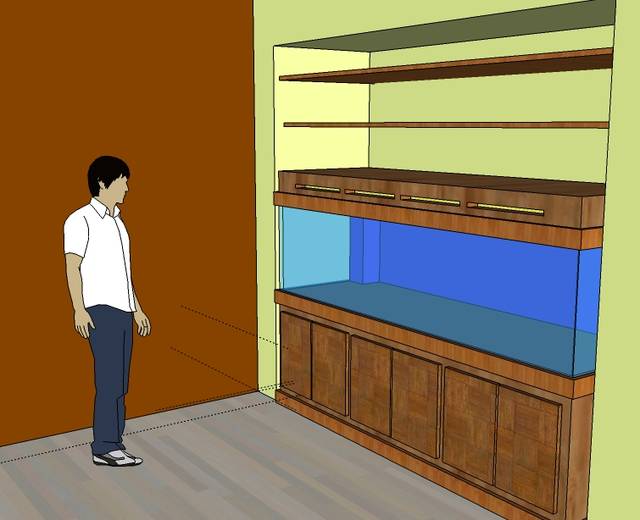
Now I have a big 90" x 28" x 7'H alcove for a tank.
Well, almost. I built some shelves there for pictures and such, and the wife really wants to keep them.
Limits the overall height, but otherwise not an issue.

All that boring stuff said : Here is the dream!


Almost everything will be DIY, except the tank itself. Debated that it bit, but decided against it.

Another admission : I love building things. Tinkering with the tank is about as much fun as the tank itself.
 
GENERAL OVERVIEW
This is the general plan.
Most of these items need a lot more detail of course. That will follow in time.
This will go SLOWLY. I am pretty busy, and not really in any hurry.
But it is real now. I have started on some of the pieces.
Some of the decisions below are not entirely standard, but power efficiency and a natural approach are important to me.
Almost everything will be DIY. I see that to be as much fun as the aquarium itself.

TANK SIZE: About 250 Gallon
Length = 88"
Width = 28"
Height = 24".
These dimensions were really dictated by the alcove it has to go in.
This is one of the few things I am buying. Needs to be perfect, and big heavy acrylic is tough.


FISH+REEF
This will be a combination fish/reef. Slightly more emphasis on the fish than on corals.
It will be a peaceful tank. No overly aggressive fish. All reef safe.
There will be a couple of large tangs. Exact TBD
Probably one large school of small fish. Dither-fish.
Quite a few small individual species, darting in/out of rock.
It will be a large random mixture of coral types/ SPS/LPS/softies.
Probably mostly softies. I like the motion.

LIGHTLY LOADED, LOTS OF SWIMMING ROOM, OPEN WATER DESIGN
This is a personal preference of mine.
I really do not like the look of a tank absolutely jam-packed with fish and coral.
I like an expanse of sand and a fair amount of simple open water.
That said, it will hardly be bare.
I do have the willpower (won't power) to keep it fairly lightly loaded.
As a bonus, it reduces maintenance and emergency problems hugely.
This does require moving a fair bit of live rock to sump though.

AQUASCAPING
As above, it will be fairly open.
The concept is to have a center shallow shelf like area, and few pillar like formations on the ends.
The center shelf will have the hard corals, and be brighter/shallower.
About 3' wide or so. Sloping from sand very near front, up toward back, against the wall.
Hard corals will be higher in the water, so less lighting needs.
The pillars will have softer corals, and have caves/such for the fish.
Lots of swimming area for the fish.

LIGHTING
The concept is to be bright in the center of the tank, and less bright on each end, but not dark.
This focuses the intense lighting on the corals that need it.
This also is combined with the auqascaping to emphasize shallow center, deeper darker ends.
Should also focus vision toward center of the tank.
Lighting will be LED based. I am experienced in that.
It will be probably be a bit less blue and a more natural color. I like that. Not a fan of 20K MH.
With LEDs, I can add really deep purple to make other colors pop, and still have more natural color.

FILTRATION

Filtration will be mostly algae turf scrubber based. Good experience with that on my smaller tank.
Small skimmer, no ozone, no filter socks, no denitrators. I actually have all those, sitting in a box.
Lots of advantages when done right.
Very natural approach. Eliminates a ton of hassles.
Dual 400 square inch screens with 900 GPH pumps. LED based red/blue lighting.
Gravity flow back to tank, for pods.

TANK STAND

Oak veneer. Three sets of doors
Nothing really underneath. Sump and everything is in fish room.
Very strong! Earthquake country.

SUMP

Always dark. 75 gallon box
900 GPH return pump. Internal powerhead
Shelves of live rock rubble
No need for a huge sump with algae-turf-scrubber filtration.

REFUGIUM

Shallow 25G box
Sand bottom on part, baffles, some live rock
Wide for gentle flow
Weak LED lighting, red/blue for algae

EQUIPMENT ROOM

All of the equipment will be in the garage, on the other side of the wall.
Plan to make a ventilation system, and section it off a bit more.

ADDITIVES
The plan is to use kalwasser + individual additives, not a calc reactor.
Section one is automatic kalk. Pumps rodi into stirrer module, timer based.
This will be adjusted to less than full needs.
Section two is automatic calcium/alk/mag
Individual dosing tanks, really just for final tweaking.
Section three is automatic top off
From rodi tank. Yes, separate from kalk, deliberately.
Water from RODI, same as now.
Water changes will be largely manual. Less is needed on an ATS system.

CIRCULATION
To be honest, this is the part I am most uncertain about. Very tricky.
Two 900 GPH pumps from ATS, exit near top, facing forward. Low velocity.
One 900 GPH sump return, exit underneath central shelf. Lots of small jets
LOTS of powerheads for the rest of the circulation.
Likely a series of smaller ones along the back. A couple at the ends.
The concept is to have a forward Gyre.
Circulates from top back, forward on top, down front, back along sand, and up.
Powerheads are just SO much more efficient.

CONTROLLER
Uses Arduino microcontroller.
Controls lighting, dosing, chiller.
Already on my small tank, but needs updating.

CHILLER

This will use the algae turf scrubber screens and evaporative cooling.
A simple fan across the screen results in huge evaporation and cooling.
Like an old fashioned swamp-cooler.
Cheap and easy. Works great in California low humidity.
Controlled by micro controller.

TANK VENTILATION

Tank and lighting will be vented outside, pulling air from living room.
Set of pipes from top-back of tank, to 4" pipe.
Fans outside. (Salt air concern)
Ventilation is meant to be moderate. Some air will vent to living room.
 
STATUS:

Stand is almost done.
Turf scrubber filters are almost done.
Refugium is done.
Sump was done, but I think I will rebuild it. Not happy with it.
Looking for quotes on tank.

So more than a dream, but less than a reality.
 
Well thought out, you really have all bases covered. It's good to have such a detailed plan, even though plans will inevitably change. For the powerheads for the gyre effect, if the tank is very open for swimming, don't you want to minimize powerheads and hide them behind rockwork when possible to keep the overall look 'clean'? Or how about a lesser amount of powerheads by using larger ones? Just food for thought.
Looking forward to following this build.
 
CookieJar said:
Well thought out, you really have all bases covered. It's good to have such a detailed plan, even though plans will inevitably change. For the powerheads for the gyre effect, if the tank is very open for swimming, don't you want to minimize powerheads and hide them behind rockwork when possible to keep the overall look 'clean'? Or how about a lesser amount of powerheads by using larger ones? Just food for thought.
Looking forward to following this build.

Powerhead positioning is a real issue, yes.
I think I can put a few down low, in the back, pointing up.
But they can suck in sand, and are harder to reach for cleaning.
Others will have to be at the top though.

The tank is a bit low overall, and it is 30" wide, so I think the upper-back will not be all that obvious.

The problem with a few big powerheads is you get a lot of point-flow, not a wide stream.
On the other hand, with 3/4" plexi, the little ones magnet mounts do not work.

I even had a bit of a wacky idea: Use air driven tube pumps.
Like the little air risers on the old under gravel system, but on a large scale.
Oddly, it is one of the most efficient ways to move water, and produces zero heat.
And as long as the bubbles are large, they all dissipate on the surface quickly.
 
I've never seen the air bubble pumps, but if they mean you'll have big air bubbles I doubt you'll want that. Besides the distracting visuals, you're going to get serious salt spray.
 
I tried a real quick DIY air powered pump in my sump once.
Easy to try. Take about a 1.25" pipe, put an air stone at the bottom.
A surprising amount of water comes out, and the bubble dissipate pretty quick.
I am not advocating it, but it is an option.
As a bonus, you make the pipes square, out of the same color acrylic as the back.

Salt spray is the big downside as you mention though. Makes a mess everywhere long term.

Most likely I will just stick to normal power heads.
 
I like the liberal use of microcontrollers and it sounds like you've been thinking this one over. Good luck. Still not too late to build the tank!!
 
houser said:
I like the liberal use of microcontrollers and it sounds like you've been thinking this one over. Good luck. Still not too late to build the tank!!

You are evil! J)
Never do that to an avid DIYer.

I did a very detailed plan on the tank build as well.
Since it is in an alcove, only 1 side is clear, so it is a good candidate for a plywood DIY tank.
Planned built up this lamination: 1/8" acrylic : 3/8" ply : 3/4" stringers : 3/8" ply : 5 oz fiberglass.
All bonded with epoxy.
I did that as a test on my refugium, and it worked great.
Lighter, strong, and a whole lot cheaper.
The complication on the main tank is the extra loads, the sheer force on the front face, the expansion/contraction of
dissimilar materials over 8', and the big problem that if it fails, the results are catastrophic.
Nothing like flooding the house with 250 gallons of water, and destroying thousands of dollars in livestock and equipment.
So I chickened out. :tired:
 
The stand is done and in the living room now.
Oooh / Ahh. So little progress. Argh.
Well, Tour-De-France will be over this week, and wife+kid are going out of town,
so I expect some major progress soon.

Stand still needs to be leveled though. Our floor is a joke. Up to 1/4" difference in spots.

Then maybe someday someone will take my money for a custom tank.
It is absurd how long that is taking. But not like I am in a big hurry.
Bit of a change of direction on that lately though. My fault.
There was a steel braced open-top tank on this site that looked rather interesting.
I am talking to Kritter on that.
 
Quick updates:

1) Still negotiating with Kritter. Taking a while.

2) Spent a lot of money today buying LEDs, heat sinks, and electronic junk.
Getting ready for building the lighting.
(Both for main tank, and turf scrubbers)
Turf scrubbers are not sensitive, so cheap ebay LEDs from HK there.
But for the main tank, I am trying the new Cree XP-G LEDs, so only bought 20 of those so far.
Ordered from Cutter (Australia), since they are the only small volume people that seem to bin.
I have to build my "cluster" of LEDs, get the color right, and measure the PAR value.
I really have no idea yet how many I will need, other than a "LOT".
I hope the color is some nice even multiple, like 2 Cool White, 1 Royal Blue, 1 Blue. But I never get that lucky.
Toying with the idea of dimmable drivers this time also, but a pain, and expensive, so probably not.
 
Rygh sounds like you are moving along pretty fast. You will enjoy the inwall. My 220 SPS is inwall just like that. Only different I did is I build the cabinets to the top of the TV nook and put big doors up there so I could hang MH's. I also punched through the back of the wall behind the tank and run the plumbing into a cabinet I built in my garage so all the filtration is out there. That way I don't have to worry about noise, humidity and spilling water inside the house. Good luck. -Chris
 
Chris : Sound more similar than you think.
I am also punching holes in the wall, and running everything into the garage.
It is actually to the left side of the tank, which is a bit of an extra pain, but still a lot better than putting everything underneath.

I thought about going up more, but with LEDs, it is right off the water, and only a few inches thick, so no need.

Funny side note: Tank is in the TV alcove, and TV is on the wall, but the stereo components, dvr, etc, all need a place to go.
So they are going under the fish tank!
Nothing like 250 gallons of salt water a foot above expensive electronics. :O
 
rygh said:
Chris : Sound more similar than you think.
I am also punching holes in the wall, and running everything into the garage.

This violates building codes (most likely- does in my area, and in Sacto) as garages are required to be a certain level of "fire proofed" and cutting the rock eliminates that. Just a FYI if it's your own house and have plans on future upgrades that may require inspection.
 
GreshamH said:
rygh said:
Chris : Sound more similar than you think.
I am also punching holes in the wall, and running everything into the garage.

This violates building codes (most likely- does in my area, and in Sacto) as garages are required to be a certain level of "fire proofed" and cutting the rock eliminates that. Just a FYI if it's your own house and have plans on future upgrades that may require inspection.

Yes, absolutely true. And good to point out to people.
Fortunately, I was planning on just making holes for pipes, not a huge empty hole.
But still a concern.
Also : Those codes are there for a reason.
An interesting alternative is to build-out the fish utility room, and then make THAT fireproof to the rest of the garage.
 
Back
Top