Hi All,
I'm new to the reef community. I have been building custom CO2 systems for planted tanks. I want to start off by sharing my knowledge with you guys on how to build a quality CO2 system to use with the calcium reactor. There are commercial CO2 systems that anyone can purchase. However, there is a DIY route. We can build a high quality industrial grade CO2 system with a few parts for the same price.
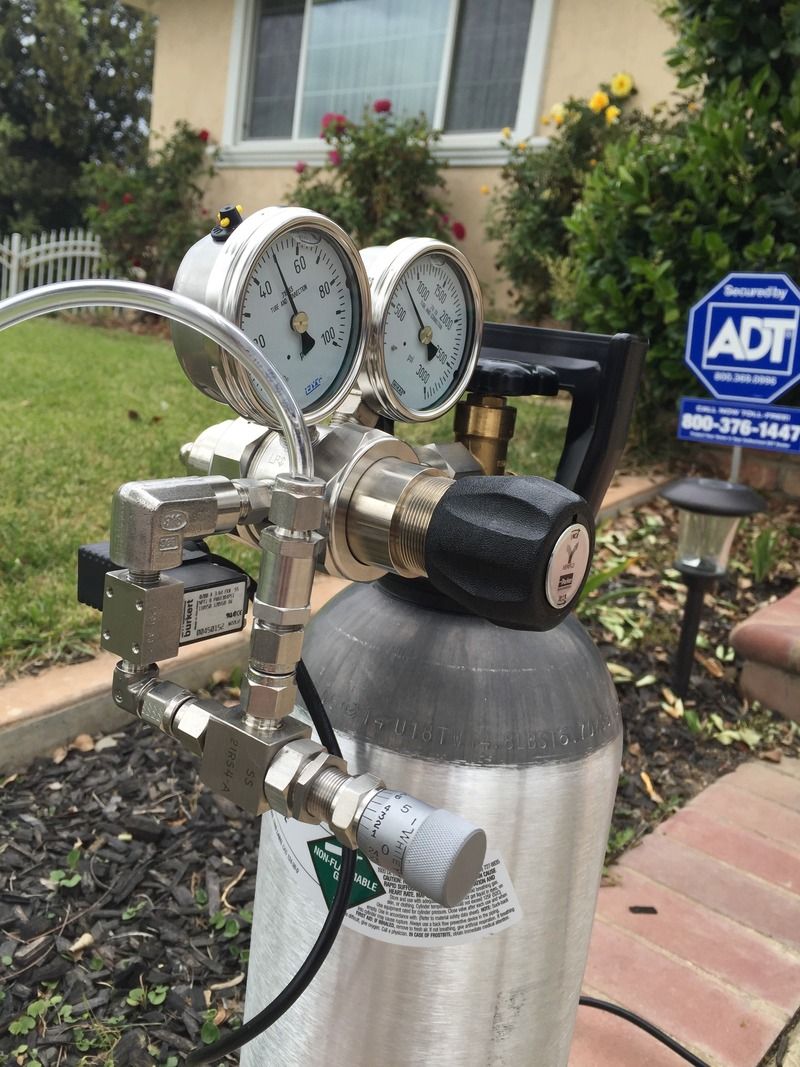
The parts you will need are:
1) Regulator
I suggest using a dual stage regulator as some single stage regulators will most likely to experience end of tank dump. When your CO2 tank is full, everything works as expected. End of tank dump occurs when the tank gets near empty and the pressure drops. This causes more CO2 to get into your tank and will suffocate your livestocks. You will need a dual stage regulator that has a working pressure at anywhere between 15 PSI to 100 PSI. Higher working pressure will also work but it's a little harder to adjust because the output pressure gauge is more sensitive.
2) CGA 320 nipple and nut
CGA-320 is the American standard thread found on Co2 tanks. Most regulators you find on Ebay or surplus sites will have different CGA connection. To make it work with your CO2 tank, you will need a CGA 320 nipple and nut. Your local welding place is a good source or online stores.
3) Fittings
There are many ways to put together a CO2 system. These are the fittings that I normally use.
-1/4 male NPT x 1/4 male NPT hex nipple (Swagelok cross ref. SS-4-HLN-200 or 150. 200 is 2 inches. 150 is 1.5 inch)
-1/4 female NPT x 1/8 male NPT elbow (Swagelok cross ref. SS-4-RSE-2)
-1/8 male NPT x 1/8 male NPT elbow (Swagelok cross ref. SS-2-SE)
*The SS in front of the Swagelok part # stands for Stainless Steel. Substitute it with a B if you want brass.
5) Burkert 6011 solenoid (1/8 NPT) and Clippard solenoid
These are the most reliable solenoids and is proven by the hobbyists.
6) Metering Valve
Metering valve is the most vital part. A good unit will provide you with a precise and constant CO2 reading.
There are a few good metering valves such as Swagelok S series, Ideal V54-1-12, Hoke 1300 series and etc.,. Bear in mind that not all metering valve will work. We only use medium flow and low flow valves for our purpose. The metering valve I'm using is a Hoke 1300 series. This valve required tube fitting reducer 1/4 in. x 1/8 in tube OD (Swagelok SS-400-R-2) to mount the CO2 tubing.
I'm new to the reef community. I have been building custom CO2 systems for planted tanks. I want to start off by sharing my knowledge with you guys on how to build a quality CO2 system to use with the calcium reactor. There are commercial CO2 systems that anyone can purchase. However, there is a DIY route. We can build a high quality industrial grade CO2 system with a few parts for the same price.
The parts you will need are:
1) Regulator
I suggest using a dual stage regulator as some single stage regulators will most likely to experience end of tank dump. When your CO2 tank is full, everything works as expected. End of tank dump occurs when the tank gets near empty and the pressure drops. This causes more CO2 to get into your tank and will suffocate your livestocks. You will need a dual stage regulator that has a working pressure at anywhere between 15 PSI to 100 PSI. Higher working pressure will also work but it's a little harder to adjust because the output pressure gauge is more sensitive.
2) CGA 320 nipple and nut
CGA-320 is the American standard thread found on Co2 tanks. Most regulators you find on Ebay or surplus sites will have different CGA connection. To make it work with your CO2 tank, you will need a CGA 320 nipple and nut. Your local welding place is a good source or online stores.
3) Fittings
There are many ways to put together a CO2 system. These are the fittings that I normally use.
-1/4 male NPT x 1/4 male NPT hex nipple (Swagelok cross ref. SS-4-HLN-200 or 150. 200 is 2 inches. 150 is 1.5 inch)
-1/4 female NPT x 1/8 male NPT elbow (Swagelok cross ref. SS-4-RSE-2)
-1/8 male NPT x 1/8 male NPT elbow (Swagelok cross ref. SS-2-SE)
*The SS in front of the Swagelok part # stands for Stainless Steel. Substitute it with a B if you want brass.
5) Burkert 6011 solenoid (1/8 NPT) and Clippard solenoid
These are the most reliable solenoids and is proven by the hobbyists.
6) Metering Valve
Metering valve is the most vital part. A good unit will provide you with a precise and constant CO2 reading.
There are a few good metering valves such as Swagelok S series, Ideal V54-1-12, Hoke 1300 series and etc.,. Bear in mind that not all metering valve will work. We only use medium flow and low flow valves for our purpose. The metering valve I'm using is a Hoke 1300 series. This valve required tube fitting reducer 1/4 in. x 1/8 in tube OD (Swagelok SS-400-R-2) to mount the CO2 tubing.
Last edited: