You are using an out of date browser. It may not display this or other websites correctly.
You should upgrade or use an alternative browser.
You should upgrade or use an alternative browser.
Our DSA Neo 105 Build
- Thread starter coral4me
- Start date
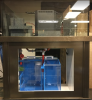
I needed a way to route cables and also punch a hole in my inner wall because the sump pump cord was too short to reach around the back of the stand.
I decided to install Panduit Cable Manages that I bought at Wierd Stuff Warehouse a few years back. Then I used a heat bender to bend it, although you could just simply cut it if you wanted.

The nice thing about these cable managers is the covers hinge. I mounted the cable managers with a 1/4" spacer on top to allow room for the covers to hinge up out of the way when added/removing cables.


Next, I cut a pass through into the dry side. Even though I was careful, I scuffed it a bit. In this pic I had just added a little Bondo and sanded.

Here's what it looked like after a little paint touch-up.

Looks like it had always been there. Right?
Note: the wire managers line up with the cutout, but were removed during the addition of the cutout.

Next post, the tank will actually move to my house and get water, soon to be followed by aquascaping.
I decided to install Panduit Cable Manages that I bought at Wierd Stuff Warehouse a few years back. Then I used a heat bender to bend it, although you could just simply cut it if you wanted.
The nice thing about these cable managers is the covers hinge. I mounted the cable managers with a 1/4" spacer on top to allow room for the covers to hinge up out of the way when added/removing cables.
Next, I cut a pass through into the dry side. Even though I was careful, I scuffed it a bit. In this pic I had just added a little Bondo and sanded.
Here's what it looked like after a little paint touch-up.
Looks like it had always been there. Right?
Note: the wire managers line up with the cutout, but were removed during the addition of the cutout.
Next post, the tank will actually move to my house and get water, soon to be followed by aquascaping.
Attachments
Last edited:
Depending on how much return flow you will run, you will probably have to extend the emergency n secondary drain higher.
In a bean animal, the water level in the overflow is just over the bottom of the horizontal leg on the secondary.
The drop from the grate in the overflow to that level is pretty big and will likely cause splashing noises.
I ran into the same issue with mine.
Sent from my iPhone using Tapatalk
In a bean animal, the water level in the overflow is just over the bottom of the horizontal leg on the secondary.
The drop from the grate in the overflow to that level is pretty big and will likely cause splashing noises.
I ran into the same issue with mine.
Sent from my iPhone using Tapatalk
The siphon will drain a lot of water fast and quiet. The durso functions a little louder because it pulls air down with the water into the sump. I use the gate valve to dial in siphon flow to match the amount of water going into the overflow.Great setup! I have the same overflow but plumbed it very differently. What does that siphon pipe do? Sorry - don't know much about plumbing.
Here it is, my new tank.
Do you think the AP700 is over kill?

@roostertech and @Flagg37 gave me a few rocks along with a bunch of cerith snails. Thanks guys!
Just happened to have mounted the light to the ceiling earlier that day.
Do you think the AP700 is over kill?
@roostertech and @Flagg37 gave me a few rocks along with a bunch of cerith snails. Thanks guys!
Just happened to have mounted the light to the ceiling earlier that day.
Finally got water in the tank the night before the BAR frag swap.

Rocks from the ice chest helping to cycle the tank.

Some of the frags are from the frag swap. Thanks everyone.

This last weekend I began dismantling the scape from our 90 gallon bow front and staged almost everything in the new tank so I could get the lower base rock out of the old tank and begin constructing the new rock formations.


Rocks from the ice chest helping to cycle the tank.
Some of the frags are from the frag swap. Thanks everyone.
This last weekend I began dismantling the scape from our 90 gallon bow front and staged almost everything in the new tank so I could get the lower base rock out of the old tank and begin constructing the new rock formations.
Last edited:
I had been really looking forward to building the aquascape. It was a little crazy at first with so much rock and so many corals. I was kind of like, where should I begin, but you'll see I am off to a pretty good start.


A few shots in the tank. You can see it's basically a big frag rack. I was thinking I'd make the arm without hole mostly Zoas.
(Top Down)

(Straight on from Front)

(Right Side of Tank)

A few shots in the tank. You can see it's basically a big frag rack. I was thinking I'd make the arm without hole mostly Zoas.
(Top Down)
(Straight on from Front)
(Right Side of Tank)
Vincent, great eye! You are spot on with your overflow observation. I ended up making the durso, syphon and emergency overflow longer and I even added a flange to the inside of my overflow lid. The water pours through the grate and onto the flange to quiet it. I cut the a window in the top of the flange so if it were to get plugged up, the water could just go over it.Depending on how much return flow you will run, you will probably have to extend the emergency n secondary drain higher.
In a bean animal, the water level in the overflow is just over the bottom of the horizontal leg on the secondary.
The drop from the grate in the overflow to that level is pretty big and will likely cause splashing noises.
I ran into the same issue with mine.
Sent from my iPhone using Tapatalk
Last edited:
The scape is coming together nicely! I really like the shelfs and how there is lots of open room for the corals to grow and fish to swim I've always been a fan of scales where lots of negative space is used. Nice work! I've enjoyed watching this tank come together.
Sent from my iPhone using Tapatalk
I've always been a fan of scales where lots of negative space is used. Nice work! I've enjoyed watching this tank come together. Sent from my iPhone using Tapatalk
sfsuphysics
Supporting Member
Gebus Christmas.... there's that one youtube guy "The King of DIY" but I think I'm going to ask for a revote, because you're a fricking artist with what you're doing on that tank.
roostertech
Guest
Gebus Christmas.... there's that one youtube guy "The King of DIY" but I think I'm going to ask for a revote, because you're a fricking artist with what you're doing on that tank.
That youtube dude only make ghetto looking craps lol. Not even close to this quality.
sfsuphysics
Supporting Member
Yeah I like watching him occasionally, although I watch a few videos and I find out how many people have channels about their tanks (most of which I don't want to hear about). I liked his big epoxy & plywood bottom build he did with a large 4-side viewable tank. Unfortunately gives me dangerous ideas watching him
I see a Ryobi osc. tool, did you use that to cut/flatten the rock?
Yeah, I used it a little. It cuts through the rock pretty well. I try to find rocks that naturally fit together, but you can help them fit a little better with the osc tool. I also shape the emaco to match and look like the rock structure and extend the rock up to make a few extra connection points when joining some of the pieces.
Sent from my iPhone using Tapatalk
I tried it long ago with a Dremel blade and it went dull pretty fast, guess a carbide grit might be a better choice for the task. I'm tempted to use a concrete grinding cup on a right angle grinder to make the rock flat, just tempted; have too many projects lined up.
Pretty nice job on the acrylic !
Pretty nice job on the acrylic !