Reef nutrition

Nabil's 81G Fiji Cube

helious

Supporting Member
Hi folks!

Long time lurker in various reefing channels. My name is Nabil and I live in south San Jose near the top of the Alamaden area. I’ve decided to more actively engage in the community with my own build thread! I’ve been in the hobby since I was in high school (with some lengthy breaks for school, move all around the country, kids, etc). My current tank is an 81G mixed reef tank that I wanted to tell you all about. It’s been running for a little less than a year.

Equipment
Tank: Fiji cube 81G INT middle (white stand)
Lighting: 2x Noopsyche K7 Pro V3
Sump: Fiji 24
Filter: Klir fleece roller
Skimmer: Reef Octopus EsSense S-130
UV: Green killing machine 24w UV
Heater: Hygger 500w
Reactor: BRS with sicce 1.0 pump (has carbon right now, used to run GFO in it)
Fuge light: Tunze eco chic
Return pump: reefbreeders nautilus 2500
Powerhead: MP40
Control: Hydros X4, XP8, X2, and XS all in a collective (more details to come on this)
RO: Koolermax 5 stage with buddy booster pump

Fish (the ones with names are courtesy of my kids)
Sailfin tang (big giant)
Hoevens wrasse (edward)
Bicolor angel (barry)
Coral beauty angel (bella)
Longnose hawkfish (schruder)
Blue green chromis
Lemon damsel
Ocellarus clown (cheech)
Midas blenny (mitch mcconnel)
Neon cleaner goby

Inverts
Mexican turbo snails
Astrea snails
Margarita snails
Tuxedo urchins
Black urchin
Brittle star
Serpent star
Long tentacle anemone
Bubble tip anemone
Coral banded shrimp

Corals
Duncan
Green star polyp
Lobophyllia
Goni of some sort
Cotton candy torch
Octospawn
Zoas
Acan
One fledgling SPS
A few mushrooms

In a future post, I’ll walk through my Hydros controller setup (which I may have gone a little nuts and tried to connect everything to it). I’ve got small daily automatic water changes going from a small fish room under my stairs. I’ve also done some fancy programming of the hydros to hook up a button box from JB aquatics.

I’ve also got a home-made battery backup for my MP40 that is kind of slick in that it only turns on when the house power is out. This way I can use my Hydros to turn the MP40 off at the power strip for maintenance or feeding without the battery keeping it on. Will cover how I did that in another future post.

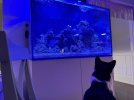
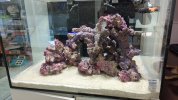
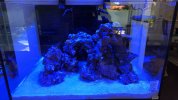
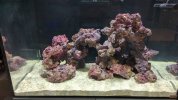
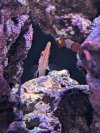
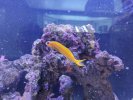
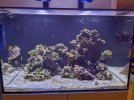
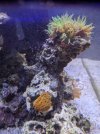
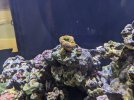
And now some random pictures! (some are old from when i first set up the tank, and others are more recent).
 

Attachments

  • PXL_20231231_212538688.MP.jpg
    PXL_20231231_212538688.MP.jpg
    77.9 KB · Views: 41
  • IMG-20230513-WA0005.jpeg
    IMG-20230513-WA0005.jpeg
    225.3 KB · Views: 41
  • IMG-20230513-WA0007.jpeg
    IMG-20230513-WA0007.jpeg
    185.1 KB · Views: 41
  • IMG-20230522-WA0004.jpeg
    IMG-20230522-WA0004.jpeg
    233.7 KB · Views: 38
  • PXL_20230702_053348029.jpg
    PXL_20230702_053348029.jpg
    94.5 KB · Views: 41
  • PXL_20230709_194006101.jpg
    PXL_20230709_194006101.jpg
    139.4 KB · Views: 44
  • PXL_20231212_024357043.jpg
    PXL_20231212_024357043.jpg
    160.6 KB · Views: 45
  • PXL_20231219_022221409.jpg
    PXL_20231219_022221409.jpg
    100.1 KB · Views: 42
  • PXL_20231231_212516614.jpg
    PXL_20231231_212516614.jpg
    140.8 KB · Views: 38
ok, on to how the hydros is set up!

Getting back into reefing this time, I really wanted to avoid schlepping buckets or even long hoses around the house. Talking to a friend (@felipems), I realized that automatic water changes are a thing now. This made me super excited! I think because I was trying to be cheap initially, I picked Hydros as I could get auto water changes going with a $200 XS. Since then, I’ve bought enough Hydros stuff that it’s probably similar in cost to Apex. But here we are!

So, i thought i’d go through the various functions of my Hydros setup to highlight the interesting bits:

Hydros Control (2).png


Auto-water changes: As I said before, this is what sold me on controllers. use the Hydros aws config for this (which is great). There’s a low and a high water sensor in my return chamber. This allows me to pull a gallon or so of water out of the tank at a time without disrupting the return pump.

I’ve got little usb powered pumps from amazon in the return chamber, ATO tank, and salt tank. https://www.amazon.com/gp/product/B07B8XR2JF/ref=ppx_yo_dt_b_search_asin_title?ie=UTF8&psc=1 These pumps are nice because you can just cram ¼ RO tubing into the output. Despite their small size and low cost, they have been pretty reliable. And since they are so cheap, I can treat them as almost disposable. I got some check valves (which i think were designed for RO pressure), and these pumps couldn’t open them. So, i run some siphon breaks (just a union with a little hole drilled in it) to keep water only going one way.

One addition I made to my awc setup was to also add some valves. This is part of my safety net (which I've learned the hard way that I need). First, my drain line goes to a saddle valve on a sink in a wet bar near my tank. I was a little worried about God knows what from that sink back flowing into my drain line. So, there’s a valve that opens only when water changes are going.

There’s also a float valve on the end of the fill lines (salt and ATO water) in the return chamber. Due to it being kinda hard to get two independent float valves into that chamber, both of the fill lines go into one. This will ensure that I will never overflow the sump. But it also means that i can pump salt water back into my ATO tank. Ask why I know? =) So, there’s a valve on each of those lines that ensures that water can only flow through salt or ATO but not both. I use the depends on feature of Hydros to make the valves behave correctly.

The Hydros aws program is also your ATO. So, Hydros considers the aws “off” when it’s in ATO mode. It doesn’t know that the ATO is actively running. So, this means that I need the valve that allows ATO water to flow to the sump to be on most of the time (unless a water change is going). The hydros valves are normally closed. This means that when they are unpowered, they are shut. So, holding them open all the time is not great for these valves. The ATO valve was getting really hot and I suspect it wouldn’t last in this state. Thankfully, you can also get a normally closed ¼ push fit valve! (https://www.amazon.com/gp/product/B07BS3GBYH/ref=ppx_yo_dt_b_search_asin_title?ie=UTF8&psc=1). Turns out this is exactly the same form factor as the valve that you can get from hydros. So, I just swapped it in there and soldered on the new valve. Now when the controller applies current to the valve, it closes rather than opens. I just switched the dependency mode to OnIfOff and voila! Top tip, if you want to do this and you don’t already have a Hydros valve to swap around, you can just buy a cable like this: https://www.amazon.com/gp/product/B01N9U09ML/ref=ppx_yo_dt_b_search_asin_title?ie=UTF8&psc=1 and wire it onto the valve above. It won’t have the cute little white plastic box, but it should work just fine. All for roughly the same cost as a Hydros valve.

Button box: I got one of the button boxes from JB Aquatics. https://www.jbaquaticsllc.com/ Very nice and I recommend them highly! It’s got a switch (with red cover) and 4 buttons. I use the red button to disable the skimmer so I can empty the cup. I always feel like I'm launching nukes!

The 4 buttons are set up for helping with day to day feeding stuff. Even though I’m a computer guy by nature and trade, I want to be able to do things with my tank without whipping out my phone. So, I wanted a feed mode that would turn off the wave pump and lower the return pump to min speed. I wanted it to time out after a while (10 minutes) and return to normal. I also wanted to be able to forcibly turn off feed mode (and return to normal) with a button. Finally, sometimes, I wanted to blow the food around a bit while feeding, So I wanted to be able to turn the wave pump on a little and then be able to to turn it back off. Suffice it to say, the standard mode control input functionality of Hydros with a button box was not up to the task. However, I was able to get all of this done!

Ok, let’s talk through the buttons:
  • Button 1: enables feed mode (note this is not an actual Hydros mode, but a virtual output in Hydros that behaves similarly).
  • Button 2: Stop feed mode early (override)
  • Button 3: Toggle the wave pump on and off
  • Button 4: engage the actual Hydros feed mode. This works in the very standard way that modes do and actually turns off the pumps entirely. I use this when feeding anemones or corals. I don’t have a way to force this back to normal with a button (mostly because I ran out of buttons). So I just do that in the app if I want to end it early.
Ok, I won’t go into all the details of how I got this done (it would take a while). But I’ll cover some of the highlights. First, the documentation provided by JB Aquatics was instrumental: https://docs.google.com/presentation/d/1g1Pzc4hJKKC0WetraZuIaVcGoeVuk45bJ-zQPiQMiDc/edit I had to make use of the pattern of making an input for the button (which is instantaneous) and then converting it into a virtual output (that either sticks or requires a toggle to go back). This is all covered in the docs above. Next, I used the min on-time to allow my virtual feed mode to auto-time out. I can also make the Hydros Wifi feeder trigger this virtual output when it comes on and the pumps will stop while it’s rotating.

hydros logic.png


Then, I was thinking through all the logic. I want the wave pump off during feed mode, unless it’s been toggled on by button 3. I also want everything off in feed mode, unless it’s been overridden. Long story short, I really needed a special logical operator: exclusive or (XOR) which means one or the other of the inputs, but not both. Hydros doesn’t support XOR…but using ANDs, ORs, and NOTs (which Hydros does support), we can build XOR! I found a little logic simulation tool online and set it all up and tested it there (see the schematic below). Then, once it behaved the right way, I went and set up all the combiners, virtual outputs, etc. to make it work in Hydros. Nice that you can hide outputs, so i can keep all of the combiners that make this work off my main page.

Return Pump: nothing too fancy here other than I got a nautilus pump (one of the few 0-10v pumps) that I could wire up to the hydros. I also got a flow sensor running on my return line. This isn’t terribly useful day to day, just kinda cool. Also surprising that my big ole return pump maxes out at about 450 GPH due to my plumbing and tank bulkhead (I think)

Skimmer: With all my automations and the button box, I was having trouble with my skimmer overflowing when the water level in my sump got too high (like water back flowing from the tank when the return pump was off). So, I put a water level sensor in the skimmer sump chamber to help prevent that. This is rather than making the skimmer depend on the return pump (this mostly worked, but for weird reasons under certain circumstances like doing maintenance or otherwise, might fail and overflow the skimmer).

I also got the special hydros skimmer cup sensor. I tried mounting it like all the other water sensors (with the sensor in the water and the magnet outside). I was super frustrated that it just didn’t work, would never detect water. I couldn’t believe that Coralview would put out such crap! Well…turns out for the skimmer sensor, the magnet goes in the cup (which in retrospect is a far superior design) and then it works just fine. Whoops!

Fleece roller: I recently got a Klir fleece roller. I went with it because of its articulating design. Any other fleece roller would probably require me to shift my sump around out of the cabinet (eww, unpleasant) any time I wanted to service it. I saw mixed reviews of the Klir, so I was concerned. But, I thought I could mitigate what people didn’t like by controlling it with the Hydros. This has turned out to be true so far (have had for about a month) I can mount the sensor in the sock chamber, not in the device. I can also control min/max on/off times and get alerted if it stops entirely. This video had all the info:

RO: just using the standard RO Hydros program with low and high sensors and an output connected to the buddy booster. This makes water when it’s needed or when I need to make a new batch of salt water. I use the high sensor to shut off the buddy booster, but i also have a float valve in the tank to make sure it turns off (the buddy booster will shutdown under pressure too). One annoyance is that the RO output does create a flush and boost outputs that I don’t use and can’t be hidden.
 
You can create a siphon break in your return nozzle so it doesn't overflow your sump too. Highly recommend some rope leak sensors too!
 
Thanks for the reminder. I do have a rope leak sensor around the sump.

On the siphon break, great idea. I never thought of that! I was thinking I could put a little hole facing down in the overflow?
 
Back
Top