Hi everyone. This will be my first attempt at build thread. If you end up follow along, you will find I'm a horrible writer. I’m grammatically awful. If it were not for spell check, I would have been kicked off of the internet years ago. So, if you can suffer through my run-on sentences and poor punctuation, I’ll try to make this a learning experience for both of us.
First, a bit of history. About 7 years ago, my family and I had to move on short notice from a 3rd level condo to a single story home with a garage, finally. This meant I had to take down my 55g and relocate my livestock in a hurry. I was able to transport everything in many buckets with the help of some good friends. At the time, the priority was to get the baby’s nursery setup, the 55g “temporarily” went into the garage. When it came time to setup the tank in the house, I found a great deal on a drilled 90g with stand and canopy from a fellow reefer that was moving to the east coast. The plan was to setup the “new” 90g tank in my office and plumb the drain and return through the wall into the garage. This would allow me to use a 100g Rubbermaid stock tank and triple my total water volume. Much to my disappointment, the floor in my office began to sag slightly under the weight of the empty tank and stand. So into the garage it went to collect dust for 6 years.
At the end of this last year I had a couple of weeks off and some time to kill. After finally coming to grips with the fact I will not have my tank inside my house without major floor reinforcement, I decided to give the 90 another shot. If my fish are doomed to live in the garage, they should have the best home available.
So on with the show.
Following a few tips from a Rubbermaid thread on another forum, I decided on a mostly modular setup that can be disassembled and cleaned. The foundation of which is:

To make sure I can move this 100g behemoth when needed, I built a rolling platform from 2x4s and plywood. This platform was sized to also allow room for mounting my Dolphin Amp Master 3000. The intension was to allow enough flow from the return pump to negate the need to in tank power heads.
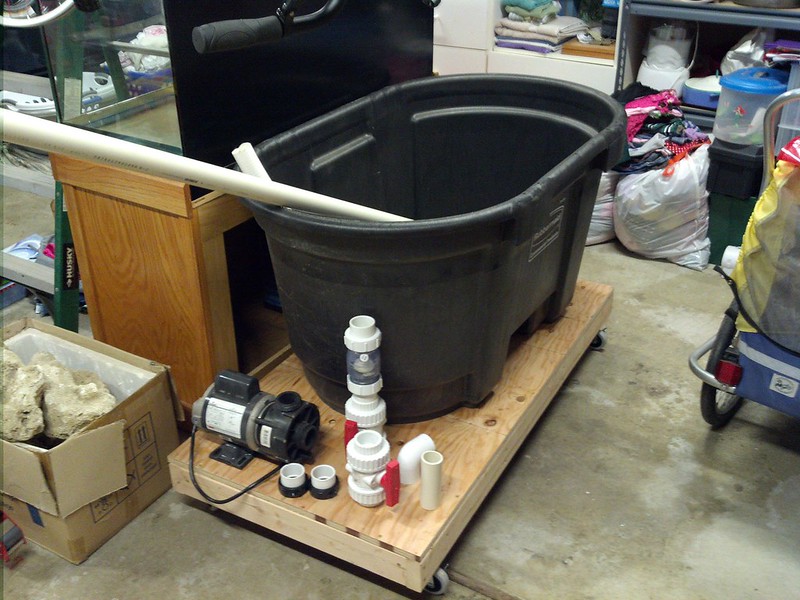
Part of the return system allows 3 x ½” auxiliary feeds (on the right) for additional filtration, reactors, and/or a chiller in the future.
A ½” down spout was added to allow easy water changes. There are also 2 x 1”valves to feed the tank’s return manifolds.

The pickup for the return pump uses 1½” PVC with a flared 3” strainer stuffed with coarse “pond mesh” to filter out any large partials that would otherwise muck up the pump.

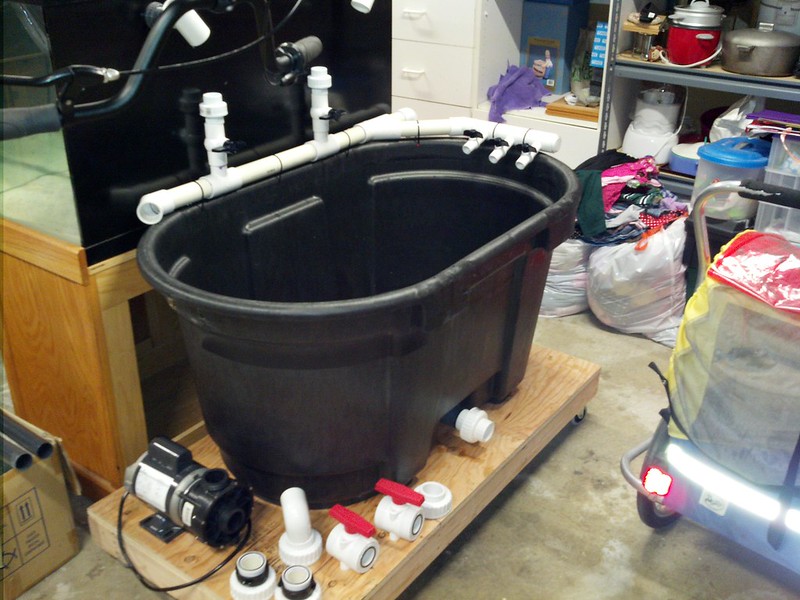
The end result, wet testing with drainage.

During 1st round leak testing, I supplied the tank from one of the ½” feed lines. The return manifold was not yet built.


After everything passed the leak check, I applied many coats of Killz and reassembled the sump.

I ended up reusing the built-in 1¼” bulkhead to add a ¾” drain on the now back of the sump.

Each half of the tank is serviced by a 1” manifold. Supplied from a 1” barb on the back and terminating into 3 x ½” loc-lines. The hope is this will provide all the necessary flow for the tank.


Since the tank was already drilled and installed with 2 x “cost to cost” style overflow boxes, I had a little option but to use a durso’ish drain. I figure I would also add a part of the “beananimal” failsafe system and run ¼” RO tubing to the overflow boxes to initiate siphon if needed. All in all, it’s defiantly quiet enough for the garage.

So after many days of cutting, filing, gluing, countless trips to the hardware store, begging, borrowing and a metric ton of understanding from my wife. I finished plumbing my tank (mostly).

First, a bit of history. About 7 years ago, my family and I had to move on short notice from a 3rd level condo to a single story home with a garage, finally. This meant I had to take down my 55g and relocate my livestock in a hurry. I was able to transport everything in many buckets with the help of some good friends. At the time, the priority was to get the baby’s nursery setup, the 55g “temporarily” went into the garage. When it came time to setup the tank in the house, I found a great deal on a drilled 90g with stand and canopy from a fellow reefer that was moving to the east coast. The plan was to setup the “new” 90g tank in my office and plumb the drain and return through the wall into the garage. This would allow me to use a 100g Rubbermaid stock tank and triple my total water volume. Much to my disappointment, the floor in my office began to sag slightly under the weight of the empty tank and stand. So into the garage it went to collect dust for 6 years.
At the end of this last year I had a couple of weeks off and some time to kill. After finally coming to grips with the fact I will not have my tank inside my house without major floor reinforcement, I decided to give the 90 another shot. If my fish are doomed to live in the garage, they should have the best home available.
So on with the show.
Following a few tips from a Rubbermaid thread on another forum, I decided on a mostly modular setup that can be disassembled and cleaned. The foundation of which is:
To make sure I can move this 100g behemoth when needed, I built a rolling platform from 2x4s and plywood. This platform was sized to also allow room for mounting my Dolphin Amp Master 3000. The intension was to allow enough flow from the return pump to negate the need to in tank power heads.
Part of the return system allows 3 x ½” auxiliary feeds (on the right) for additional filtration, reactors, and/or a chiller in the future.
A ½” down spout was added to allow easy water changes. There are also 2 x 1”valves to feed the tank’s return manifolds.
The pickup for the return pump uses 1½” PVC with a flared 3” strainer stuffed with coarse “pond mesh” to filter out any large partials that would otherwise muck up the pump.
The end result, wet testing with drainage.
During 1st round leak testing, I supplied the tank from one of the ½” feed lines. The return manifold was not yet built.
After everything passed the leak check, I applied many coats of Killz and reassembled the sump.
I ended up reusing the built-in 1¼” bulkhead to add a ¾” drain on the now back of the sump.
Each half of the tank is serviced by a 1” manifold. Supplied from a 1” barb on the back and terminating into 3 x ½” loc-lines. The hope is this will provide all the necessary flow for the tank.
Since the tank was already drilled and installed with 2 x “cost to cost” style overflow boxes, I had a little option but to use a durso’ish drain. I figure I would also add a part of the “beananimal” failsafe system and run ¼” RO tubing to the overflow boxes to initiate siphon if needed. All in all, it’s defiantly quiet enough for the garage.
So after many days of cutting, filing, gluing, countless trips to the hardware store, begging, borrowing and a metric ton of understanding from my wife. I finished plumbing my tank (mostly).
Last edited:


