Our mission

First Reefing adventure.. 65G AIO

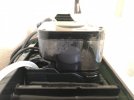
Put in a float valve just in case you forget to turn off the water. I also drilled my water container near the top and ran a tubing to a drain as a fail safe overflow. Are you using anything to bond your rocks together for your scape? If not consider e-marco cement.

i have a float valve installed both on the mixing container and ATO reservoir. Secondary fail safe is the RO filter itself. It have a build in timer to only run continuously for ~30mins before auto shut down to prevent the pump to overheat. I cannot disable this. Its a 400gph unit, so 30mins is enough for my need.

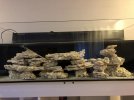
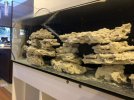
On the scape, i am using a combination of super glue and reef safe epoxy.
 
I may tweak a little more, especially the right scape. Not too happy with it. The tank 16" width doesn't allow too much room to play with depth.

As for securing the scape, i have a couple of stick of Instant Ocean epoxy. Its supposed to be reef safe, however, the instructions say use on dry surface. Darn, i'm hoping to remove the rock from the tank, apply epoxy and put it back. Hope to take the rock out for 2-3 mins at most.

Anyone knows if the epoxy will work on wet rock? If not, what other alternative do i have. I started with superglue when i did the scape before cycling., Its messy and doesn't hold too well. I was hoping epoxy will be my solution.
 

Attachments

  • IMG_1331.jpg
    IMG_1331.jpg
    94.3 KB · Views: 182
  • IMG_1332.jpg
    IMG_1332.jpg
    114.5 KB · Views: 177
  • IMG_1333.jpg
    IMG_1333.jpg
    123.9 KB · Views: 170
  • IMG_1334.jpg
    IMG_1334.jpg
    111.1 KB · Views: 173
I haven’t used that epoxy but have used similar products from tunze and ocean wonders. It should work on wet rock, I use it to attach frags to the rocks in my tank.

With the epoxy, you need to put it somewhere so it creates a bond when it hardens. If you just put a little ball in between two pieces it can separate. So you want to find good deliberate spots to bond the rock. If you have spots of exposed epoxy they will grow coralline algae over them, but in my experience it grows slower on the smooth expoxy surface so if you have spare sand I believe some people will push some sand into the epoxy as it is hardening.

I started with superglue when i did the scape before cycling., Its messy and doesn't hold too well. I was hoping epoxy will be my solution.
I’ve had good success with super glue on spots where it’s flat enough to provide ample surface area to bond the two pieces. it looks like you have fairly flat rock so you may be able to do it? But the rock I used had flat sides on both ends because of how it was cut
 
I haven’t used that epoxy but have used similar products from tunze and ocean wonders. It should work on wet rock, I use it to attach frags to the rocks in my tank.

With the epoxy, you need to put it somewhere so it creates a bond when it hardens. If you just put a little ball in between two pieces it can separate. So you want to find good deliberate spots to bond the rock. If you have spots of exposed epoxy they will grow coralline algae over them, but in my experience it grows slower on the smooth expoxy surface so if you have spare sand I believe some people will push some sand into the epoxy as it is hardening.


I’ve had good success with super glue on spots where it’s flat enough to provide ample surface area to bond the two pieces. it looks like you have fairly flat rock so you may be able to do it? But the rock I used had flat sides on both ends because of how it was cut

Yes, superglue works well if its flat enough. The Marco Shelf rock is not perfectly flat. I believe the STAX rock is flat on both side. I'll try to see i can put epoxy on the side that is not too visible from the front. Good to hear it should work on wet rock! Thanks.

This will be a weekend project - complete landscaping, connect all the pump and skimmer and install the cabinet door. Maybe Sunday if i'm on tasks, i can transfer the fish from QT to DT and start a new batch of fish in QT. This is more fun that work. Its performance review week and i hate paperwork.
 
Very frustrating evening. The epoxy doesn’t stick to wet rock. I’m about to give up securing the rock. It’s quite stable without any adhesive.
Tried superglue as well. It’s too messy to apply mortar underwater. I have 2 option
1. Leave it as is
2. Dry out the rock and redo the cycle

I leaning for just leaving it as is.


After mixing the epoxy put a dab of superglue on the epoxy after you form the shape you need. Should hold epoxy in place until it dries.
 
After mixing the epoxy put a dab of superglue on the epoxy after you form the shape you need. Should hold epoxy in place until it dries.

thanks. I did that for a couple of less stable joint. Leaving the rest as-is since it’s quite stable.
 
Why not use the nyos cement?

the rock is already cycle and in the tank. How long it takes the cement to cure? I can take it out and apply the cement, but if it takes a long time to cure, it will killl off the bacteria.

In hindsight , I should have cement the pieces before cycling in the tub.
 
the rock is already cycle and in the tank. How long it takes the cement to cure? I can take it out and apply the cement, but if it takes a long time to cure, it will killl off the bacteria.

In hindsight , I should have cement the pieces before cycling in the tub.
Less than 10 min. You can dump or spray tank water on it a couple times while it’s out if you’re worried. I wouldn’t be tho
 
I got epoxy on the most part. I’m content for now.

now moving on to the next challenge. I bought a used tunze 9004 dc because i can never find it new in stock. Took a while to figure out how to disassemble and reassemble. It’s working now I think.

see picture on the bubble level. This is with 25% power. Since I just filled the tank with fresh saltwater, no livestock of any kind, is this the right setting?

i could use some guidance on setting up the skimmer.

so far, no micro bubbles escaping to the display tank. Since tthis is a used skimmer .it’s broken in.
 

Attachments

  • D86B89AB-DC78-4673-AEAD-2C0CA27AC7CA.jpeg
    D86B89AB-DC78-4673-AEAD-2C0CA27AC7CA.jpeg
    85.1 KB · Views: 196
  • 64F77BEA-CA8E-4499-A61F-F72D30D8698E.jpeg
    64F77BEA-CA8E-4499-A61F-F72D30D8698E.jpeg
    71.2 KB · Views: 180
Tank is all setup. ATO installed. Wiring check. Temp stable at 77. Salinity 1.025-1.026. Ammonia and NItrate should be 0 since its all new water. Rock is completed fishless cycled and have been soaking for almost 2 months now. I should be good i think.

The used skimmer have some wire insulator damaged near the pump. No bare wire exposed, just the insulator got rip. Still works for now. Good news is Tunze is going to send a brand new replacement pump.

Will transfer 4 chromis and 2 clowns from QT tomorrow. Will then clean out the QT tank and get ready for the next batch of fish.
 
Next and final batch of fish in the QT. Going to outsource the qt for kole tang. Final stocking list

6 green chromis (started with 7 but lost one jumpers in qt)
3 azure damsel
1 neon dottyback
2 clowns
1 kole tang

I know it’s a lot of fish, but beside the tang the rest stay small.

Wonder if this is consider heavy or med bio load?
 

Attachments

  • E3CF83B1-2E47-45C8-B3A6-470B5FC52645.jpeg
    E3CF83B1-2E47-45C8-B3A6-470B5FC52645.jpeg
    92 KB · Views: 163
Last weekend is setting up Hydros Control and redo the wiring . Its a mess of wires. I have 13 plugs. :)

Struggle a bit since the Hydros is not easy to debug if the simple instruction didn't work. Got it to work eventually.

1. Failsafe of heater. I set high of 82F. Heater will be turn off if temp exceed 82. I may need to adjust the high temp in summer. Heater have its own internal thermostat.
2. ATO failsafe. I have a optical sensor setup incase ATO sensor fail and overflow the DT. Tunze ATO have 2 sensors (optical + mechanical). The extra sensor from Hydros is the 3rd failsafe.
3. Flow pump controller. I have 2 AC sicce powerhead. Using the Hydros to enable poor-man wave controller.
4. Skimmer schedule. I'm leaning on turning on the skimmer only at night due to the noise.
 
I think you are better off setting the heater to a high value then use the controller to do on/off.

It sounds like you are planning to rely on the heater to control itself with the controller as a backup? The way I do it is heater set to 82 then my controller keeps it at 77. If my controller fails it will not heat over 82.
 
Why let it get up to 82?
Summer tank temp can get higher. the High temp is to detect heater failing ON. In my small tank, in summer, it will go >80. I don't have this tank long enough to know the temp swing.


I think you are better off setting the heater to a high value then use the controller to do on/off.

It sounds like you are planning to rely on the heater to control itself with the controller as a backup? The way I do it is heater set to 82 then my controller keeps it at 77. If my controller fails it will not heat over 82.

The Hydros controller specifically recommended against using the controller to do on/off. I don't understand why. Maybe liability?

Yes, i'm using heater internal thermostat as the main control and controller as backup.
 
I think you are better off setting the heater to a high value then use the controller to do on/off.

It sounds like you are planning to rely on the heater to control itself with the controller as a backup? The way I do it is heater set to 82 then my controller keeps it at 77. If my controller fails it will not heat over 82.

By the way, what would be the benefit using controller as main control? Isn;t it the same either way? Both heater internal control and external control have to both fail before bad things happen.

If the controller more precise in maintaining temp? I'm pretty happy with this new heater. Temp varies from 77.9 - 78.1 in the last 24 hours.
 
Back
Top